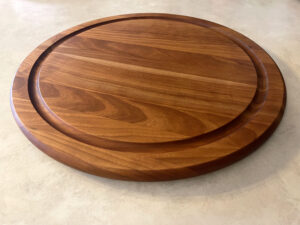
We found this 16.5″ diameter, unfinished Red Eucalyptus (Grandis) lazy Susan at a local Savers, Second Hand Used Clothing Thrift & Vintage Store, and I decided to refinish it.
The turntable had been glued in place instead of using screws. Unfortunately, during removal, the plastic turntable pulled off some of the wood beneath, resulting in one large chip and a couple of smaller ones. The largest fragment was reseated with Gorilla Wood Glue, pressing it under two 25-pound weights overnight. After curing, the raised chip was sanded down to level it and the debris was blown away with an air duster. Then the remaining voids and chipped areas were filled with with all purpose stainable wood filler.
During evaluation of the damage, I decided that the turntable wasn’t necessary because the piece looked better and would be more stable as a low-profile stationary piece. So, rather than replace the hardware, I decided to repurpose it into a serving platter / ottoman tray / charcuterie plate.
Prep and Sanding: The Bottom

Once the wood filler was fully cured, I began leveling the damaged bottom surface using a Ryobi Corner Cat finishing sander. Starting aggressively with 40 grit high spots were knocked down, repaired areas leveled, and a consistent plane was established. Next the sanding progressed through 60 grit and 80 grit, using a WOLFBOX MF100 electric air duster to clear the surface between each step.
With the main leveling complete, rubbing alcohol was used selectively to pull out the remaining natural dings and dents on the bottom. Small amounts of alcohol were applied directly into the low spots, ignited, and allowed to burn off. The heat flash draws out trapped moisture and pulls up compressed wood fibers. The process was repeated until the dents were leveled, then smoothing the bottom was finished with 120 grit.
Prep and Sanding: The Top
With the bottom stable, the round was flipped over to treat the top face. The same mechanical progression was repeated—sanding through 40, 60, and 80 grit, dusting between coats—to establish a clean, flat plane.
Just like the bottom, the top had some minor surface dings. The localized rubbing alcohol treatment was repeated on these spots, igniting the alcohol to swell the compressed fibers. Once the dents were successfully drawn out, the top face was brought to a match the bottom with a final pass of 120 grit.
Micro-Refinement and Finishing
From here, both sides received identical fine-finishing treatment. Power sanding was discontinued in favor of hand sanding, starting at 220 grit and progressing to 400 grit. Between every single pass, the surface was cleaned with an electric air duster and wiped down with Swiffer replacement cloths to ensure no rogue particles remained to scratch the wood or interfere with the finishing stage.
For the finish, pasteurized walnut oil was applied evenly to one side at a time, worked deep into the wood until fully saturated, and the excess buffed off with a soft cloth. After the oil was allowed to dry for a few hours, the piece was flipped to treat the other side.
After the initial coat sat for a day, the surface was lightly hand-sanded again with 220 and 400 grit to knock down any minor raised grain and clean the surface. A second light coat of walnut oil was applied and buffed out completely. By repeating this hand-sanding and oiling process, the walnut oil cured into a dense, natural, varnish-like finish with a glass-like texture—achieved entirely without synthetic coatings.